Monday, September 26, 2011

Roll Arena!

Recently WorldWorks Games came out with a bunch of game aids to use for your gaming needs, be it RPGs, Wargaming, or anything else you could use it for. One of which was titled the Roll Arena. All of these continue in  their traditon of paper-crafting.
What is paper craft? It is where you use paper (yes paper) to build things. Naturally you wouldn't use normal paper, you use cardstock a bit thicker than normal paper, but still paper.

Back to the Roll Arena (that's why we're here right?). This beautiful and fully functioning piece is a work of art. The design of the build, the colors, and the art are amazing. I love this piece. Anyway onto some pics for you to gander and oogle.


Roll Arena instructions (6 pages), Complete Print of build (15 pages), 
T-Square (or ruler of choice), X-Cato blade, and glue. Not to forget the cutting mat.
 

I decided to base the top level of the Roll Arena on Black Foamboard
(this will keep the arena sturdier, but prove a mistake in the end)
 

Top level all assembled. All of that is made with paper!
the holes in the corners are for later.
 

Top of Arena from a side view for height purposes.

 This is the card drawer. All still paper. I noticed when sliding this
in and out, it needed under reinforcement so I glued a wide strip underneath.

A drawer is about to be assembled.

Drawer with the faceplate and handle.

Drawer completed! just paper and glue.

The bottom layer of the Roll Arena. The white areas will glue to the
underneath of the top section.
 

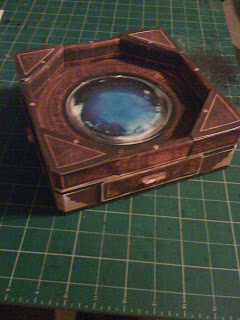
Roll Arena assembled! Not quite, something is missing.
 

 now Roll Arena assembled!! So beautiful.

Look at those drawers! sliding in and out.

 The Roll Arena also comes with 5 alternate wheels you can place inside, over the base floor. Each of them are another amazing piece of work and have additional uses for in your games. I actually didn't print any out, but if I did I would use sticker paper to print on and attach it to a piece of  foamboard.

There you have it! It is beautiful. Very few complaints I have about this one, more like suggestions for my next one (or if you get to build one).
1. Edge the edges. This means take a black sharpie and go over the white edges of paper to create depth and take the white out of the picture.
2. While the foamboard provides sturdiness for the top level, it partially takes away for the art of the Roll Arena. Use foamboard for under the alternate wheels instead to place inside.
3. The card drawer (the long one) is partially flimsy. To remedy glue a wide and long strip underneath connecting all the card slots together.
4. The card drawer is tricky to pull out and push in. The edges of each slot catch sometimes on the corner pieces. Possible remedy to glue a "guide track" inside for smoother pull/push.

I can wait to use this as practical as it is, and very affordable. Thank you to the crew at WorldWorks Games for making another incredible piece of work!

Sunday, September 18, 2011

Terraclips Build Two

Hi there, welcome back (or first time welcome). The past two weeks have been crazy enough that just now I have been able to upload some pics of a variety of projects I was working on. Right now I am able to present to you my Complete Build Two using the all 3 of the Terraclips sets again.

Again with my limited space option the whole piece is in sections for ease of storage and ease of accessing different areas. The complete build is a total of 1 3/4'x1 1/2', but it is also 4 layers, 6 for the tallest house. This build I have dubbed "The Manor", and as you will see is pretty cool (at least I thought so). So without wait, enjoy the pics!

First off we have a few overviews with different angles:
Front Overview. Here you can see an entrance into
the guest house and the fountain in the front.

Right side overview. Ignore the open walls (again I was short walls for the build).
But look at the balcony connecting the 2 buildings together. And that roof...
Back overview. Here you can see the balcony better.

 Left side Overview. From this angle you can see the main house entrance
and the balcony connecting to the second floor.

Lets tear the buildings down bit by bit, with a play by play.:

 Top roof of main building removed.
You can see 3 rooms on the top floor.
 Second layer removed. This includes the main roof of the
second building and the complete roof of the first.
 Third layer removed. Here you can see multiple rooms in each
building and the balcony that connects the two buildings.
 Fourth layer removed from the main house, 
just to show the balcony sitting freely and how it connects.
Fourth layer completely removed, including the balcony. The archways in the back
are not connected in any fashion and that area is open outdoors type.

Next we will take a closer look at how I did that fountain sitting in the front.

 Close view of the fountain. For this piece was rather simple.
We took the fountain floor tile and placed arches joined
together on top, not attached to the tile.
 Here you can see the arches simply removed.
 

This was a little smart on my part (i think). I took a Sewer floor tile
and connected it to other floor tiles with the T-Clip. Then to build
up the fountain, I simply used the balcony sides as the "walls".

Quite easy and gives some height to the fountain without it being too tall. Also gives nice structure to the piece without hindering for movement.

Next we will tear down the rest of the build for your excitement!

 As you can guess, the Sewers are underneath the build. 2 layers of sewer crawl, smell that?

 First half of the streets gone for show of sturdiness.
 Street level all gone. Here are the sewers top floor.
Notice the gap in flooring middle right side?
 close up of gap in floor. This was to lead a way between the two sewer levels.
 Bottom right corner. This is directly below the main house.
 Bottom left corner, directly below the fountain area.
Backside area.
 Half of first floor removed. The gap in first floor falls right
into the three-way tile.
 Complete bottom level of sewers (and the build). Again walls are missing, but doesnt prevent the sturdiness of the build once tiles are joined together.
Sewers lower level, broken apart to show how they separate.

And there you have it! Out of all the clips I purchased, I still had no L-Clips left over. The walls again were scarce, and if you look close enough, the buildings had a mix of street and building walls. Again this was using only 1 box of each of the Terraclips and 4 boxes of connectors. It was, and still is, fun to make these builds and I hope you enjoyed this one!

Wednesday, September 14, 2011

Cryx Command Trench cont

So I had a few requests for a size comparison for the Cryx Command Trench. The trench is 8"x10", and the height of the inside wood support is 3/4" tall giving a total of 1" height from the base to the top of the support beams. The wooden spikes not only make for a fearsome entrance, but also are placed perfectly to allow standing area for almost any model over the bumps and gears.

Here are some pics:

The Warwitch Siren and a Seether stand at the ready within the trench, ready to deal out pain to all on-comers.


Enjoy!

Friday, September 9, 2011

Targ of the Farrow

The Farrow (a Minion theme army from Privateer Press's Hordes line of miniature wargaming) are growing. This is Targ, the first minion warlock attachment for the Farrow army. He helps the warlocks keep control of their beasts.

Another commission piece from the continuing support of the Farrow, he wanted it done quick and easy. I kept with the same theme I have been going with for his pigs, so why change now?


Targ. Simple and quickly done as asked. Hope you enjoyed this round of pics. Until next time.

Dwarven Solos

In continuing with the Dwarven military I was commissioned with here are two of the solos that once again count as Mercenary models but can also be in the Dwarven Seaforge Commission. They again fit the theme the customer wanted, and were done fairly quickly.

Lord Rockbottom. With him I decided to reverse the colors given and add a little mustache.
He is still a solo figure, but looks colorful.

Thor Hammerstien. Another solo Mercenary model that can be included in this army. Yo notice his armor matches the rest of the army. Those flames turned out better than I thought they would.


You will see more of the Dwarven army in the future, as I am handed a unit at a time so I dont get swamped down. They are different to paint, but fun and quick. Until the next post, keep dry.

Dwarves on the Rise

Awhile back I had a friend mention he wanted his Dwarven "army" from Privateer Press painted, but he didnt want to pay to have them done. He also had no real time to do them himself as he worked full time and was painting other things as well. He also happens to have a Pirate "army" that I was interested in that he no longer used. I made a proposition, if he were to give me his Pirates for sale as it were, I would pay him by painting his Dwarves at my going rates. Needless to say I now own a bunch of Pirate Mercenary models for Warmachine and he is getting his Dwarven painted up :)

This post is all about his first round of Dwarves I painted. These Dwarves form the "Seaforge Commission" as they are all Mercenary models from Privateer Press's Warmachine line of miniatures. All the models are Mercenaries and can be included in some other armies or form their own army.
This unit is called the Horgenhold Forge Guard. The main and secondary army colors were chosen by customer and the rest I choose. Here are some pics:


Since the man has alot of models for this army to be painted he decided it would be quicker (and get more out of it) if they were done in the basic fashion. 5 colors I think I used: Armor, secondary army, skin, weapons, and leather. Some shaded or higlighted, but again a quick, cheap paint job. I hope you enjoyed as I got a few more of these posts coming.

Farrow Brigands

Another piggy update. Again from the Hordes line from Privateer Press. This unit is called Farrow Brigands. They are a Minion unit and therefore can run in most Hordes armies as well as now their own!
Following the same lines as the other piggies I have done, these were a commissioned unit from the same person. Enjoy the pics!


Overall keeping the skin and fur color the same, as well as the armor and weapons. This was again the most basic of paint jobs. Simple, Quick, and short. These were completed in about 2 afternoons totaling in 16 hrs if that. I am getting quicker in this.