Wednesday, December 28, 2011

Keep Diorama: Fountain Stem

Onto part two of our Keep Diorama series, Building the Fountain Stem. Yes, there is a fountain in this diorama (building that will be covered later). It was asked to be a basic stem and fountain so as not to take away from the overall display. Many ideas flew into my head, but after a trip to the local craft store, I came up with this one I liked the best.

STEP 1: Gather your materials.
Here we can see various materials I used for the stem of the fountain. All of the wooden pieces are from a local craft store, the base is a 40mm plastic base. You can see most of the wooden piece have a hole already in them which already size up to the peg. Some of the holes will need resized so the peg will fit smoothly into their center. This is an easy fix with a Dremmel. Just line up the peg to the center and drill to widen the hole.

STEP 2: Lining them up.
BEFORE we glue, we line up everything to make sure they fit properly. I wanted a special use for this fountain (you will see later), so the peg fits directly thru the rest of the fountain. Its a semi-snug fit.
We begin gluing the bottom pieces together and by now you can see everything else lines up. Remove the peg and glue all the other pieces together using PVA glue or Super glue (I prefer Zap-A-Gap). Remember, the peg is removed during this process, we want the peg to be free from them stem for a purpose.


This is the stem complete, not yet painted, but the basic of the shape.

 STEP 3: Adding decor.
Now a plain stem is nice, but adding some detail and decor would be nice. Here is the process I used.
Materials: a simple flat surface like this small base from Games Workshop. Green stuff (this ball is premade for the picture). Any object you may want to use for the decor (Just so happen to have this Games Workshop sprue from an old Empire Cannon).
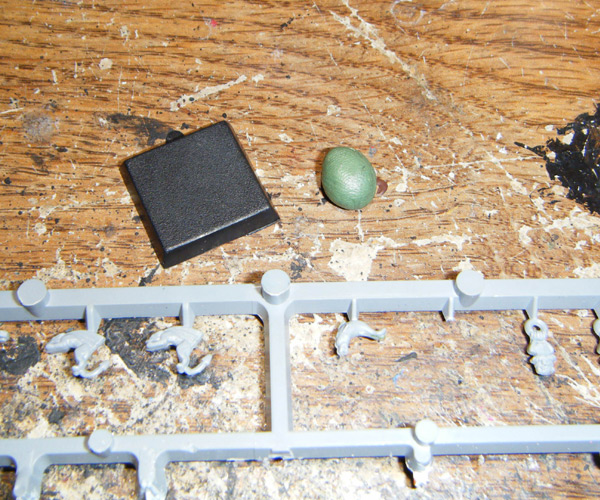
Add the ball of green stuff to the base. We want to wait about 15 minutes or longer for the green stuff to get a bit more solid (like we did for the custom bases a while back).
 Making the mold. Here I have cut free the item I am using from the sprue. I stuck a pin for ease of use to remove from the green stuff. By this time the green stuff has sat for a while and is less sticky which will make removing the item easier. Also water, water placed ontop of green stuff before the item is placed into it will make its removal easier.

And mold complete! Now we let this sit to dry overnight until it gets hard.


STEP 4: Adding the decor
This is the basic way I added the decor to the fountain stem using the stem, green stuff, and the mold we just made. First you take some green stuff and place it where you want to decor. wait a bit for it to set (about 15 min or longer).


Next drop a bit of water into the mold area and press the mold onto the gob of green stuff.

Unfortunately the molding with the lion head shown here did not work. But was able to use the picture to show how I made the dolphins for the top part. And because I was in a rush, I forgot to take a finished picture of the stem with all of its decor. But if you look up two pictures, that is the final stem piece.

Tomorrow I will cover the creation of the fountain, which will also have more pictures of the stem (since they go together).


Keep Diorama: Tree

So here is the first of seven posts on the Keep Diorama that I did for a commission. Each of these can be found under the Label "Keep Diorama", along with the custom bases tutorial and the miniatures I did up for the piece. These may also be found under the "Tutorial" label as I am going to show how I built the whole piece, but in easy to read sections. Onto the Tree:

Building the tree:

STEP 1: What you need:
*Woodland Scenics makes good trees. They also have a Tree Kit which I will be using for this project. This is the 3"-5" Tree Kit. It comes with tree sprues, and color foliage (dark green, medium green, and light green).
*PVA glue. Here I am using Aleene's Tacky Glue. You can pick it up at most hobby stores.
*Turf blend. here I am using Woodland Scenics Blended Turf (green blend). I picked this because it will be lighter than the medium green foliage to bring a bit of highlight to the leaves.


STEP 2: Making the tree:
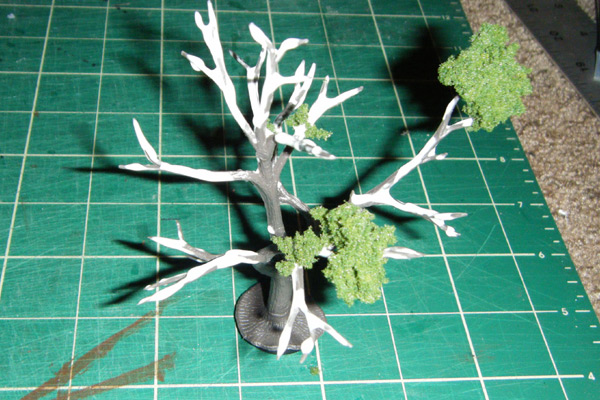
So we take our tree sprue, separate the base, and twist slightly the tree to give it shape. Then add your glue to the branches. I usually give a bit of time before I dip the tree (with glue) into the pile of foliage.


clumps of medium green foliage. Seriously, Woodland Scenics foliage (dont smoke it).

STEP 3: Leaving it to dry.
And here we can see the foliage drying. You can also see bits of branches, and if you want to add more foliage, this is the time to do it. Next we take the turf blend and lightly sprinkle it over the tree. If you choose a lighter color of turf blend it will give more definition to the leaves, and your tree.

STEP 4: Complete!
And here we have a completed tree! You may notice there is a base attached to the bottom of this tree (the slight black shadow at the bottom), this was added so the tree may be randomly placed on the display piece. The base is same as the miniatures that accompany it (25mm round).

So there is the tree. I like this tree. I think it will fit well with the rest of the diorama piece.

Tuesday, December 27, 2011

Eagle Knight of Andoren

This was the final miniature commission piece for the Keep Diorama. He is from Reaper Miniatures line " Pathfinder". Normally, the Eagle Knight of Andoren is a human. But for this Commission he is a fire elemental in human form.


His skin was a bit hard to do, as fire for skin. And the armor is supposed to blend from a dark red metallic to a slight highlight...but it doesnt show that way thru the camera. Colors were requested and I do like how the rest of him turned out, aside from the armor.

Klaus Copperthumb, Dwarf Thief

Klaus is another commission piece for the Keep Diorama. He is from Reaper Miniatures line "Dark Heaven Legends".


His colors were requested, and like the others his original base was stripped to make way for the custom base.

Theda, Priestess

Theda comes to me from Reaper Miniatures line "Warlord". She was a bit easier to assemble because she comes with no base. Colors were requested that she match those of an air warlock so I matched with light blues and white. She was also another commission piece to be used in the Keep Diorama.

Elliwyn Heatherlark, Gnome

Straight from Reaper Miniatures line "Dark Heaven Legends" is Elliwyn Heatherlark, a gnome.


Another commission piece for the Keep Diorama, her original base was stripped and replaced with the custom random stone base. Colors were requested.

Fergus the Weaver

A bard walks into a bar... Not really. This is Fergus, he is from Reaper Miniatures line "Dark Heaven Legends".  Another commission piece for the Keep Diorama.


Original base was stripped for the custom one. Colors were requested.