What I used:
Liquitex Basic (acrylic paint)
-Black, Grey, and White
- Light Brown, Brown
Woodland Scenics Blended Truf-Green
Woodland Scenics Medium Green Flock
Woodland Scenics Weeds
STEP1: Paint!
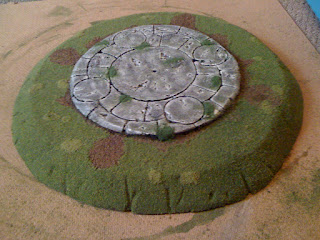
So apparently I forgot to take some pictures here. Well as you can see I painted the Stone Alter and the Ballast added from the last post. So here are some finished painted pics of the hill and stone alter. The hill is still the same green we added long ago, the brown ballast was painted using the Acrylic paint Brown, then mixed with light brown, and mixed a bit of white in to raise the color.
The Stone Alter was painted by mixing the black and grey, then straight grey, grey mixed with white, and finally in highlight areas straight white. It is starting to come together now!

The pillars were painted in the same fashion as the Stone alter using the same acrylic paints. For the most part these pillars are finished and look great.
STEP 2: Flock You!
(See I like puns) Now to add the grass for the hill. We are using (Why do I say we? Its just me here) Woodland Scenics Blended Turf, Green blend. This provides an almost natural grass color and has variety of colors in it so as not to be bland 1 color grass. Take your PVA Glue and spread out an area to cover with the grass.
I pour an extra bit ontop of the glue and press down firmly to stick it in place. Then shake off the excess into the blue tub. NOTE: Make sure blue tub is clean and empty, you dont want bits of stone or other getting into the blend, you can always reuse the excess.
Continuing flocking until the hill is completely covered. It looks beautiful right now.
In the same fashion here I used PVA Glue in random spots to stick down some green flock and weeds. The light green patches is the green flock. the green spots on the alter is the Woodland Scenics Weeds.
Oh la la, she is beautiful! Now lets add all the bits together!
As I mentioned at the beginning of the project this is a terrain piece to be used for Warmachine/Hordes games. As such it can be used for a King of the Hill scenario, it can also be used for the Mosh Pit scenario because of the 14" circle top of the hill. Now because I added so many parts there can be a variety of King of the Hill and as such I have made names for them. I will share the names with each of the pics :)
King of the Hill
Super King of the Hill
Extreme King of the Hill
Mega King of the Hill
NOTE: Now I realized I said that 5" circle made earlier on that we would get to it...Apparently I missed taking pics of it. Although it was made in the same fashion as the 10" stone alter. cut in half, design outline and paint. This top piece is a stand alone to be added if you so choose as with the pillars.
And there you have the finished piece! It is beautiful and works so well. I will have to get some in game shots with this, but you can fit a 50mm between all the other pillars. Now you can keep the extra bits free form and place when you want (the 8 pillars and the top 5" stone). I am going to add magnets to the bottom of each piece and the top of the hills so that they dont move when being played on.
I declare that this piece be finished! So there you have the Ogroth Ruins- King of the Hill piece. I am going to work more on this set, but first I have to paint something. I think I have an idea. Upcoming in this Ogroth Ruins set are a few more basic hills, some smaller (4"x6") ruins, and an actual mosh pit area! So stay tuned if you like. Until next time...


No comments:
Post a Comment