Update today, September 9th. Recently we had heavy rains and flooding in my area. We are ok and so is all my stuff ;) No real flooding in the neighborhood, but the city suffered bad. Road closures, School closings, and wee Work has been shut down the past 2 days. This gave me plenty of time recently to do painting and also toy with the idea of finishing Dungeon X! Also worked on tearing apart, and cataloging, my Complete Build One of the Terraclips terrain. I will be working on a Complete Build Two shortly as well as possibly diving into Dungeon X!
With most of my painting Updates I do, I decided to make a new tag called "Commissions" which will mark which projects I do for pay as opposed to ones I do for personal. There are other tags I am thinking of possibly the army name as tags for Warmachine/Hordes.
For now that is all, back to painting as I have a few projects still lined up to do for others.
Friday, September 9, 2011

Tuesday, September 6, 2011
Terraclips Build One
Well after some free time I was able to squeeze into the past week, I was able to make a complete build out of all three of the Terraclips sets! Now this was a massive build, I wanted it to be a decent size and it came out great. 3'x3', you read correctly, three feet by three feet of awesome build. This was done with only 1 copy of each box (Streets, Sewers, and Buildings of Malifaux) and 4 boxes of clips. If I had extra cash, I would have gladly bought another box of streets or buildings (probably buildings) to fill up more areas like the one tiny area with nothing there - I ran out of ground.
Also, because of the limited space for storage, I had to build each section in 2'x2' areas. This is why you will not see clips connecting every tile and also why different sections can be removed for the lower levels. But easier to store, which makes me happy.
I now present you with Build One of the Terraclips, all three sets were used in this making. Enjoy the pic heavy madness!!


Next we will be going section by section to reveal the layers beneath. This may take a while.


Well you saw each section revealed and torn down to bottom most layer. Now we are going to build the city back up level by level, bit by bit.


This was great fun to build, even figuring out how to connect it all was a frustrating joy, a joy none the less. Even with skipping some clip connectors and using the T-Clips instead of L-Clips, I did run out of L-Clips. I did purchase 4 boxes remember?
Until next time.
Also, because of the limited space for storage, I had to build each section in 2'x2' areas. This is why you will not see clips connecting every tile and also why different sections can be removed for the lower levels. But easier to store, which makes me happy.
I now present you with Build One of the Terraclips, all three sets were used in this making. Enjoy the pic heavy madness!!
Overview of complete Build One. Notice that one tiny area left bare?
It was between that or a taller building.

Overview from a different angle.


Overview from the back.

Side angle.

Next we will be going section by section to reveal the layers beneath. This may take a while.
Bottom Left corner. Note the catwalk leading from the streets to the lookout area.
Lookout area top floor.

Underneath the lookout area.

Catwalk removed as well as the bottom floor of lookout area.

Top Right corner. Note the beautiful buildings.
We will call it a church for now.

Top roof of church removed. The rest of the roof is inaccessible,
the walls just for support.

The roof removed! Exposed ground floor...or is it?

Ground floor of the area. Stairs lead up to church ground floor,
and appears to be sewers underneath?

Middle Top side. We shall call this the Merchants House.
Notice the L shape of the building, very tricky.

Another angle shot of the Merchants House. Here you can see the roof was not attached,
I ran out of the angle pieces.

Although with roof not attached all the way, I can do split reveal on the top floor.

Roof completely removed for the Merchant House. Notice the balcony area
(I did forget to attach the last piece of balcony)

Top floor removed for the Merchant House. Pay no attention to the Sewer Tile,
I needed a floor piece and this was hidden anyways.

Merchant House removed, sewers revealed. Is there
a secret passage that connects the two?

Middle Left section. The Inn.

Roof removed. Ugly green floors. Also yes, another piece
of railing was forgotten here.

Top floor of Inn removed. Quite basic actually.

Inn section removed to reveal the sewers below. Notice how a small section
of the Inn remains on the tile section above it.

Middle section. Old House. You can see the stairs that would lead to the area of the Merchant House.
Also, the roof of this tiny old house is partially missing (I had no roof tiles left.)

Old House roof removed.

Under the Old house appears to be a sewer entrance...

Top Left section. Nothing much really here, a part of the Inn and basic street.

Under the street is the rest of the sewer area!

Well you saw each section revealed and torn down to bottom most layer. Now we are going to build the city back up level by level, bit by bit.
Ground level overview of Build One.

Level 2 attached to each section.

Level 3 added to each section.

Level 4 added to each section. Mostly rooftops.
Overall view and complete Build One!

This was great fun to build, even figuring out how to connect it all was a frustrating joy, a joy none the less. Even with skipping some clip connectors and using the T-Clips instead of L-Clips, I did run out of L-Clips. I did purchase 4 boxes remember?
Until next time.
Monday, August 29, 2011
Sewers of Malifaux Terraclips!
Sewers of Malifaux. Terraclips.
Just a quick build I put together as soon as I received the set. I purchased a box of Connectors with this as well. This took about 30 minutes to assemble.
Overall, the art is beautiful and the pieces fit together nicely. Building takes a small learning curve, just where to fit all the pieces together. But you can build what you want and the simple directions on the back cannot be confusing.
So without delay, here is the quick build of the Sewers of Malifaux::


Just a quick build I put together as soon as I received the set. I purchased a box of Connectors with this as well. This took about 30 minutes to assemble.
Overall, the art is beautiful and the pieces fit together nicely. Building takes a small learning curve, just where to fit all the pieces together. But you can build what you want and the simple directions on the back cannot be confusing.
So without delay, here is the quick build of the Sewers of Malifaux::
Level 1 of the sewers. You can definatly see the 1" grid here, but look at that grimmy water...ewww.
Level 2 of the Sewers. I wanted to try the catwalks and a ladder. As you can see part of the catwalk is damaged. Or appears that way, that is just a short piece with a long railing on the side.
And here we have completed level 2 of the sewers by adding a room above the sewerline.

Sea Dogs on the run, and the seem to have trapped a Menoth jack! Notice the one pirate on the "broken" catwalk. a single clip connects that piece and he is on the edge, sturdy as flat ground.

Buildings of Malifaux Terraclips!
Buildings of Malifaux. Terraclips.
Just a quick build I put together as soon as I received the set. I purchased a box of Connectors with this as well. Tho I did start to run out of certain clips near the end. This took about 50 minutes to assemble.
Overall, the art is beautiful and the pieces fit together nicely. Building takes a small learning curve, just where to fit all the pieces together. But you can build what you want and the simple directions on the back cannot be confusing.
So without delay, here is the quick build of the Buildings of Malifaux::


Just a quick build I put together as soon as I received the set. I purchased a box of Connectors with this as well. Tho I did start to run out of certain clips near the end. This took about 50 minutes to assemble.
Overall, the art is beautiful and the pieces fit together nicely. Building takes a small learning curve, just where to fit all the pieces together. But you can build what you want and the simple directions on the back cannot be confusing.
So without delay, here is the quick build of the Buildings of Malifaux::
Level 1 of the quick build.main entrance, archways to a courtyard, and 3" wide stairs leading up. This is actually a hugh building if you think about it, but a test to how big I can go.

Level 2 of the building. 1" stairs going up and...a balcony! The balcony is 1" wide and goes around the back of the second floor. See the door propped open?
Building complete! Rooftops! And as you can probably see I did run out of L-Clips so I had to use T-Clips in the end, this is where a second box of Connectors will come in place.

Seems like some Salty Dogs had their hideout invaded by Menoth! Parts of building removed so we can see inside. And thats beauty because the levels are not connected to each other!
Streets of Malifaux Terraclips!
Streets of Malifaux. Terraclips.
Just a quick build I put together as soon as I received the set. I purchased a box of Connectors with this as well. This took about 30 minutes to assemble.
Overall, the art is beautiful and the pieces fit together nicely. Building takes a small learning curve, just where to fit all the pieces together. But you can build what you want and the simple directions on the back cannot be confusing.
So without delay, here is the quick build of the Streets of Malifaux::


So there you have a quick build of the Streets of Malifaux Terraclips! I hope you enjoyed looking as much as I have building it!
Just a quick build I put together as soon as I received the set. I purchased a box of Connectors with this as well. This took about 30 minutes to assemble.
Overall, the art is beautiful and the pieces fit together nicely. Building takes a small learning curve, just where to fit all the pieces together. But you can build what you want and the simple directions on the back cannot be confusing.
So without delay, here is the quick build of the Streets of Malifaux::
The basic street level with a ramp to level 2! You can see archways and a doorway that comes with the doors you can leave punched out or stand closed or open. The ramp assembled has little nubs sticking out so a figure can stand in the middle without sliding down.
Second level of the streets. Connected to each other, but this level is completely removable to see whats going on below this level! Stairs leading somewhere above. The stairs are wide enough for a 30mm or smaller figure to stand on them.
3rd level of the Streets of Malifaux. This was before I opened the Buildings and just wanted to see it all stack.
Streets of Malifaux complete and tested by the power of Menoth, mostly used for size comparison.

So there you have a quick build of the Streets of Malifaux Terraclips! I hope you enjoyed looking as much as I have building it!
Terraclips in Hand!!!
Well a long time coming, but well worth the wait.What are Terraclips? Well they are a collaboration brought forth from WorldWorks Games and Wyrd Miniatures. They are a 3D Terrain System, fully functional with each set, which is based in the Wyrd Universe, a city known as Malifaux.
They have a beautiful design and artwork and come in a 1" grid format, which is perfect for RPGers and the Wargamers.While it does say 1" grid, there are some pieces where you dont actually see the grid, but alot of places that you do - so it may not actually work that well for Wargaming do to the fact you could measure out visually before you actually move. But they are beautiful!
Each set (there are 3- Streets, Buildings, and Sewers) comes with aplenty of floor tiles (6x6" and 3x3"), wall tiles (6x6" and 3x3"), 3 stairs and, depending on the set, special tiles to use. Streets comes with ramps and archways, Sewers comes with catwalks, Buildings comes with balconies and roofs!
Enough talk. I grabbed up one of each set and started building. I also got some pics of these quick builds for show here and at my LGS. So I will present each to you in following posts titled as each set name. Streets of Malifaux, Buildings of Malifaux, and Sewers of Malifaux.
NOTE: To actually build the Terraclips, you must also purchase a box of Connectors (the clips themselves). Now different builds use different combination of clips (I-Clips, L-Clips, and T-Clips), and for all three of these sets, I purchased 1 Connector pack per Terrain Box, then I got an extra Connector box just in case (it was a smart move).
Enjoy!!
Streets Quick Build Buildings Quick Build Sewers Quick Build
They have a beautiful design and artwork and come in a 1" grid format, which is perfect for RPGers and the Wargamers.While it does say 1" grid, there are some pieces where you dont actually see the grid, but alot of places that you do - so it may not actually work that well for Wargaming do to the fact you could measure out visually before you actually move. But they are beautiful!
Each set (there are 3- Streets, Buildings, and Sewers) comes with aplenty of floor tiles (6x6" and 3x3"), wall tiles (6x6" and 3x3"), 3 stairs and, depending on the set, special tiles to use. Streets comes with ramps and archways, Sewers comes with catwalks, Buildings comes with balconies and roofs!
Enough talk. I grabbed up one of each set and started building. I also got some pics of these quick builds for show here and at my LGS. So I will present each to you in following posts titled as each set name. Streets of Malifaux, Buildings of Malifaux, and Sewers of Malifaux.
NOTE: To actually build the Terraclips, you must also purchase a box of Connectors (the clips themselves). Now different builds use different combination of clips (I-Clips, L-Clips, and T-Clips), and for all three of these sets, I purchased 1 Connector pack per Terrain Box, then I got an extra Connector box just in case (it was a smart move).
Enjoy!!
Streets Quick Build Buildings Quick Build Sewers Quick Build
Saturday, August 20, 2011
Cryx Command HQ Trench
Well this will be a bit of a pic heavy blogging. A you should know by now I do regularly play Warmachine and I love to paint. I also love to do terrain work, but as of now barely have anything to show for that...until now!
Recently there was a Release event and one of the bonus requirements was to build a command trench for your faction to play with. I decided to attempt this and began my planning. Unfortunately as the ball got rolling, I forgot to take pictures to show for updates, tutorial, or my mad scheming. I wish I would have, that would have made this posting a hell of a lot bigger (possibly better too).
Now I present the final product of my insanity that went into this project: the Cryx HQ Command Trench!


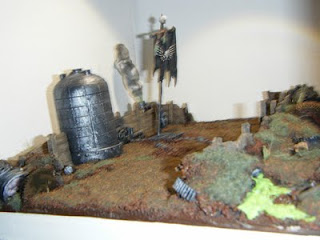


Close up shots of various parts of the terrain piece


but what really drives this piece home, what shows the insanity of it all is this....




 IT LIGHTS UP! WHAT! All the planning and time, not to mention research, just for this piece. It did turn out more beautiful than I imagined, and it was well received.
I also have separate shots of the flag by itself, which was a first also. The pole the flag sits on was extended and the skull and bone "wings" were hand sculpted by me. The flag itself is from an Ogre Kingdom army unit from Games Workshop, but it fit its purpose here.


I really, REALLY enjoyed this project. Although it did take alot of time to envision, create, and complete I am happy with this. This piece was actually a test run for something else I was working on, and seeing this works gives me high hopes for the next project.
I hope you enjoyed this post as much as I have. Now for a short break before I start painting again.
Recently there was a Release event and one of the bonus requirements was to build a command trench for your faction to play with. I decided to attempt this and began my planning. Unfortunately as the ball got rolling, I forgot to take pictures to show for updates, tutorial, or my mad scheming. I wish I would have, that would have made this posting a hell of a lot bigger (possibly better too).
Now I present the final product of my insanity that went into this project: the Cryx HQ Command Trench!


Close up shots of various parts of the terrain piece


but what really drives this piece home, what shows the insanity of it all is this....


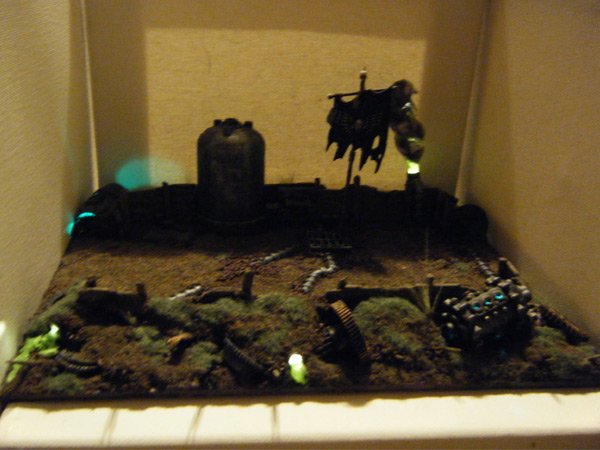


I also have separate shots of the flag by itself, which was a first also. The pole the flag sits on was extended and the skull and bone "wings" were hand sculpted by me. The flag itself is from an Ogre Kingdom army unit from Games Workshop, but it fit its purpose here.


I really, REALLY enjoyed this project. Although it did take alot of time to envision, create, and complete I am happy with this. This piece was actually a test run for something else I was working on, and seeing this works gives me high hopes for the next project.
I hope you enjoyed this post as much as I have. Now for a short break before I start painting again.
Subscribe to:
Posts (Atom)