Wednesday, September 14, 2011

Cryx Command Trench cont

So I had a few requests for a size comparison for the Cryx Command Trench. The trench is 8"x10", and the height of the inside wood support is 3/4" tall giving a total of 1" height from the base to the top of the support beams. The wooden spikes not only make for a fearsome entrance, but also are placed perfectly to allow standing area for almost any model over the bumps and gears.

Here are some pics:

The Warwitch Siren and a Seether stand at the ready within the trench, ready to deal out pain to all on-comers.


Enjoy!

Friday, September 9, 2011

Targ of the Farrow

The Farrow (a Minion theme army from Privateer Press's Hordes line of miniature wargaming) are growing. This is Targ, the first minion warlock attachment for the Farrow army. He helps the warlocks keep control of their beasts.

Another commission piece from the continuing support of the Farrow, he wanted it done quick and easy. I kept with the same theme I have been going with for his pigs, so why change now?


Targ. Simple and quickly done as asked. Hope you enjoyed this round of pics. Until next time.

Dwarven Solos

In continuing with the Dwarven military I was commissioned with here are two of the solos that once again count as Mercenary models but can also be in the Dwarven Seaforge Commission. They again fit the theme the customer wanted, and were done fairly quickly.

Lord Rockbottom. With him I decided to reverse the colors given and add a little mustache.
He is still a solo figure, but looks colorful.

Thor Hammerstien. Another solo Mercenary model that can be included in this army. Yo notice his armor matches the rest of the army. Those flames turned out better than I thought they would.


You will see more of the Dwarven army in the future, as I am handed a unit at a time so I dont get swamped down. They are different to paint, but fun and quick. Until the next post, keep dry.

Dwarves on the Rise

Awhile back I had a friend mention he wanted his Dwarven "army" from Privateer Press painted, but he didnt want to pay to have them done. He also had no real time to do them himself as he worked full time and was painting other things as well. He also happens to have a Pirate "army" that I was interested in that he no longer used. I made a proposition, if he were to give me his Pirates for sale as it were, I would pay him by painting his Dwarves at my going rates. Needless to say I now own a bunch of Pirate Mercenary models for Warmachine and he is getting his Dwarven painted up :)

This post is all about his first round of Dwarves I painted. These Dwarves form the "Seaforge Commission" as they are all Mercenary models from Privateer Press's Warmachine line of miniatures. All the models are Mercenaries and can be included in some other armies or form their own army.
This unit is called the Horgenhold Forge Guard. The main and secondary army colors were chosen by customer and the rest I choose. Here are some pics:


Since the man has alot of models for this army to be painted he decided it would be quicker (and get more out of it) if they were done in the basic fashion. 5 colors I think I used: Armor, secondary army, skin, weapons, and leather. Some shaded or higlighted, but again a quick, cheap paint job. I hope you enjoyed as I got a few more of these posts coming.

Farrow Brigands

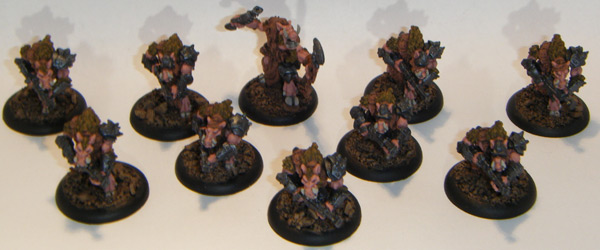
Another piggy update. Again from the Hordes line from Privateer Press. This unit is called Farrow Brigands. They are a Minion unit and therefore can run in most Hordes armies as well as now their own!
Following the same lines as the other piggies I have done, these were a commissioned unit from the same person. Enjoy the pics!


Overall keeping the skin and fur color the same, as well as the armor and weapons. This was again the most basic of paint jobs. Simple, Quick, and short. These were completed in about 2 afternoons totaling in 16 hrs if that. I am getting quicker in this.

Updates and new tag

Update today, September 9th. Recently we had heavy rains and flooding in my area. We are ok and so is all my stuff ;) No real flooding in the neighborhood, but the city suffered bad. Road closures, School closings, and wee Work has been shut down the past 2 days. This gave me plenty of time recently to do  painting and also toy with the idea of finishing Dungeon X! Also worked on tearing apart, and cataloging, my Complete Build One of the Terraclips terrain. I will be working on a Complete Build Two shortly as well as possibly diving into Dungeon X!

With most of my painting Updates I do, I decided to make a new tag called "Commissions" which will mark which projects I do for pay as opposed to ones I do for personal. There are other tags I am thinking of possibly the army name as tags for Warmachine/Hordes.

For now that is all, back to painting as I have a few projects still lined up to do for others.

Tuesday, September 6, 2011

Terraclips Build One

Well after some free time I was able to squeeze into the past week, I was able to make a complete build out of all three of the Terraclips sets! Now this was a massive build, I wanted it to be a decent size and it came out great. 3'x3', you read correctly, three feet by three feet of awesome build. This was done with only 1 copy of each box (Streets, Sewers, and Buildings of Malifaux) and 4 boxes of clips. If I had extra cash, I would have gladly bought another box of streets or buildings (probably buildings) to fill up more areas like the one tiny area with nothing there - I ran out of ground.

Also, because of the limited space for storage, I had to build each section in 2'x2' areas. This is why you will not see clips connecting every tile and also why different sections can be removed for the lower levels. But easier to store, which makes me happy.

I now present you with Build One of the Terraclips, all three sets were used in this making. Enjoy the pic heavy madness!!

Overview of complete Build One. Notice that one tiny area left bare?
It was between that or a taller building.

Overview from a different angle.


 Overview from the back.
 Side angle.

 Next we will be going section by section to reveal the layers beneath. This may take a while.


Bottom Left corner. Note the catwalk leading from the streets to the lookout area.
Lookout area top floor.
 Underneath the lookout area.
 Catwalk removed as well as the bottom floor of lookout area.


 Top Right corner. Note the beautiful buildings. 
We will call it a church for now.
 Top roof of church removed. The rest of the roof is inaccessible,
the walls just for support.
 The roof removed! Exposed ground floor...or is it?
 Ground floor of the area. Stairs lead up to church ground floor,
and appears to be sewers underneath?


Middle Top side. We shall call this the Merchants House.
Notice the L shape of the building, very tricky.
 Another angle shot of the Merchants House. Here you can see the roof was not attached,
I ran out of the angle pieces.
 Although with roof not attached all the way, I can do split reveal on the top floor.
 Roof completely removed for the Merchant House. Notice the balcony area
(I did forget to attach the last piece of balcony)
 Top floor removed for the Merchant House. Pay no attention to the Sewer Tile,
I needed a floor piece and this was hidden anyways.
 Merchant House removed, sewers revealed. Is there
a secret passage that connects the two?


 Middle Left section. The Inn.
 Roof removed. Ugly green floors. Also yes, another piece
of railing was forgotten here.
 Top floor of Inn removed. Quite basic actually.
 Inn section removed to reveal the sewers below. Notice how a small section
of the Inn remains on the tile section above it.


Middle section. Old House. You can see the stairs that would lead to the area of the Merchant House.
Also, the roof of this tiny old house is partially missing (I had no roof tiles left.)
 Old House roof removed.
 Under the Old house appears to be a sewer entrance...


Top Left section. Nothing much really here, a part of the Inn and basic street.
 Under the street is the rest of the sewer area!


Well you saw each section revealed and torn down to bottom most layer.  Now we are going to build the city back up level by level, bit by bit.

Ground level overview of Build One. 
 Level 2 attached to each section.
 Level 3 added to each section.
 Level 4 added to each section. Mostly rooftops.
Overall view and complete Build One!


This was great fun to build, even figuring out how to connect it all was a frustrating joy, a joy none the less. Even with skipping some clip connectors and using the T-Clips instead of L-Clips, I did run out of L-Clips. I did purchase 4 boxes remember?

Until next time.