Showing posts with label WorldWorks Games. Show all posts

Wednesday, December 7, 2011

Super Dungeon Explore: Dungeon 6

So as I have said earlier, this post is mainly how I built the SDE Dungeon 6. All the terrain is 3-D, made by WorldWorks Games, and cut, glued, and assembled by me. Make no mistake while it looks awesome, there is a LOT of time and effort into it. For those wondering, it is part of the Terrain LinX system and these are all from the Lost Halls of Dwarven Kings and its two supplements (Treasures and Tombs and Vault of the Ancients). You may have seen earlier posts regarding Dungeon X, these parts will all fit into that in the future.

So here we go, construction of SDE Dungeon 6:

First we assemble the floor in regular fashion. Using TerrainLinx Tabs to hold the floor tiles together. If you unsure, or dont remember, go look in the Dungeon X label. You can tell which my old printed printed out, and the new one. There are also a mix match of floor tiles here, because I didnt bring all the proper ones.

 Next, We add those posts onto the floor tiles. Everything is starting to come together. I decided since this was a quick demo, to not assemble all the posts and walls, this would make it more relaxing for our heroes.

The walls are added. All the walls shown up here are the anti-warp walls. The large door is just for a show wall. There is no in game effect or exrta actions required to go thru it. The anti-warp walls have a shelf like edge to them as well, and fit perfect for the next level. WAIT! Did I just say next level?

 Oh yes I did! You can see there is 2 parts, that connect here. Now again, fo rthe ease of this demo, I didnot use the lower level. We kept to the basics. But how are they to reach that upper level?
  Dungeon 6 complete. Wait, I am missing something am I not?
 

And here we go. Completed Super Dungeon Explore Dungeon 6. See the stairs? There are another set behind the big door. And we are now ready for our Heroes to explore!

And there you have it! The players loved this so much they cant wait for the next one!
Until next time, I need more time!

Super Dungeon Explore Demo!!!

So as promised, here are some pics from the recent Demos I hosted for Super Dungeon Explore. These were taken at my local gaming/comic store: Comic Store West.
Pictures were easy to take in the begining, then you get wrapped in the game. My first demo I grabbed no pics (or my phone lost them in the transfer. Second game I grabbed a few shots. But the third game....that will be under the next post: Super Dungeon Explore Dungeon 6.
Onto some pictures!!!

The second Demo game. Using SDE Dungeon 5 (my own naming for these), we find our heroes almost to the end of the dungeon. Rex and his brother have come out to play, and our heroes begin to regroup.


Next we have in game pics of SDE Dungeon 6 (again my own naming). Look I even get a reserved table :)
Heroes point of view, stairs!

 My point of view. Doors are just part of the wall texture. I was not counting them as anything important, just wanted to use the big door.

Our heroes for tonights match up. The youngest is my son, he is 10 and loves this game.

All the terrain is papercraft and designed/distributed by WorldWorks Games (as I may have mentioned before), part of their TerrainlinX system of terrain building. All printed, cut, built by me. Many many hours all by hand. Everyone had a blast and cant wait to see the next dungeon I come up with. Next post coming in a bit will show a bit on how I put SDE Dungeon 6 together.

Tuesday, December 6, 2011

Balls to the ...

WALLS! Here is another post update on my massive Dungeon X project, which by now you could have guessed is broken into smaller projects, one of which is using dungeons for Super Dungeon Explore!
But this update is about those walls, the many many walls I need. i decided to break it down into what I need for the most recent Dungeon mini I have now dubbed SDE Dungeon 6. Really I should just break down and finish Dungeon X, but I have a big project on my plate and trying to finish that- I think if I were to have a year off work, I might (not really) be able to finish alot of my projects. There is just not enough time and too much to do!

So without rambling on even more, I will present the pics you came to see. The walls of  The Lost Halls of the Dwarven Kings, Treasures and Tombs, and Vault of the Anchients from WorldWorks Games.

So...many...walls
Here you can see a total of 71 walls! All varying in size from 3" and 6" long.
There are a few double high walls and a great big door!

Various artwork for the standard 6" long wall. There are 10 of these so far.

Various artwork for the standard 3" long wall. There are 28 of these so far.

Special 6" long wall posing as a great door and 4 3" long archways.

Various artwork of the Anti-warp 6" long walls. These are cool and I will show them more in another post. There are 14 of these here.

 Various artwork of the Anti-warp 3" long walls. Again I will show them more in another post.
There are 19 of these here.


BTW, WorldWorks Games is currently having a Christmas sale on most of their products. I know I am getting a new set or two (or 3 or 4...).

I think this is all I need for SDE Dungeon 6 (probably more than need). I will do another post later hopefully this month about putting it all together and show some in game pics as well. Hopefully.

Back to painting now.

Thursday, November 10, 2011

Floored!

Well, as promised, I was able to finish off the floors for this massive beast called Dungeon X. Although, its not all the floors...just the ones I need for now, for SDE Dungeon. Regardless, I will be able to use them for both...
Enough rambling on, time for some pics!

 outlines of the floor tiles. These were printed on sticker paper,
much easier to do this way incase of mistakes.


 Floor tiles all cut out and ready for fitting.

Floor tiles all ready to go, bits and all.

And thats just the beginning! Now we add those colors of beautiful tiles. I print all my floor tiles on sticker paper which makes it easier to assemble. The only issue I run into (sometimes) is the links stick to the tile if used right away.
And more pics of the finished floor tiles!

 All finished and grouped for the picture.

 Here are the 6"x6" floor tiles (14 total)

 3"x3" tiles, 14 total


6"x3" floor tiles, 10 total

These are the white tiles I printed out for now.

A late addition!! These I decided to make at last minute, after the initial set of pictures were done.
Red floor tiles, for those special rooms.

So there they are. A total of 18 large tiles (6"x6"), 10 halls (6"x3"), and 14 of the small tiles (3"x3"). These are just what I finished not all what I have completed, that will be for another post.

There are technically 3 different colors of floor tiles used here, grey (from the Lost Halls of the Dwarven Kings), white, and red (both from the Vault of the Ancients expansion). All are from WorldWorks Games. I say "technically" because midway thru this project my printed died and I had to get a new one. Some of the grey printed out darker with the new printer. And then I ran out of ink (trying to print different things at once) so another set of tiles appear bluish-grey. Live and learn, they all work and thats what counts.

For now this is as far as I am getting with this project. I will start next on the many, many walls I will need - but that might be after my next project.

Thursday, November 3, 2011

Going Post-al

Catchy title, no? Well this post is during my vacation, which is more of a staycation. I stayed home but am getting paid because I am on vacation, just didnt go anywhere. I stayed home and got stuff done. Painting, for 1. Cleaning for another. For the third, I worked on the dungeon I have dubbed Dungeon X.

In part, I now realize Dungeon X is hugh! About 2'x2' area and 3 levels, 4 if you count 2 of the room tops I am making. So I was building other, smaller(ish) dungeons in the Planer. The one I am working on most right now I have dubbed SDE Dungeon 5. It is about half the size of Dungeon X. 2'x2' area and only 2 floors height. I plan on using it for Super Dungeon Explore when I get my copy. Hence the name SDE Dungeon. Yes, it is the 5th I have designed, and the one I like the most currently. Although it works for both dungeons, this will still be tagged under Dungeon X for ease of finding it.

Enough babbling, time for some pics. As you can guess from the title, this is all about the posts-the ones that connect the walls...


 2-way corner, 3-way center, and 4 way center posts.

 40 of the 2-way corner posts

 30 of the 3-way center posts

10 of the 4 way center posts

As I said, a lot of posts. Next I am working on the flooring. I hope I will be able to finish most of those in the next day or so, but I am painting at the same time to take breaks between each project.

Monday, October 17, 2011

Dungeon Week Day 1

Update to this weeks self imposed Dungeon Week. Yesterday I was able to print off more pages that I found I needed from WorldWorks Games terrain. I decided to start off the week with a little post construction. I found for this new Dungeon, I need a total of 40 2-way corner posts, 30 of the 3-way center posts, and 5 of the 4-way middle posts. With these I will be part way to the totals I need for Dungeon X. Also I needed 4 of the 3" wide stairs and decided to also make use of making 3 1" stairs extra.

Well enough babbling on, here are some pictures::


All 40 of the 2-way posts have been fully assembled, and 1 3" staircase. The 3-way center posts have been cut out and just need final assembly as well as the other staircases. Tomorrow I will continue their work and start on more floor tiles. 

Until then, watch where you cut.


Monday, September 26, 2011

Roll Arena!

Recently WorldWorks Games came out with a bunch of game aids to use for your gaming needs, be it RPGs, Wargaming, or anything else you could use it for. One of which was titled the Roll Arena. All of these continue in  their traditon of paper-crafting.
What is paper craft? It is where you use paper (yes paper) to build things. Naturally you wouldn't use normal paper, you use cardstock a bit thicker than normal paper, but still paper.

Back to the Roll Arena (that's why we're here right?). This beautiful and fully functioning piece is a work of art. The design of the build, the colors, and the art are amazing. I love this piece. Anyway onto some pics for you to gander and oogle.


Roll Arena instructions (6 pages), Complete Print of build (15 pages), 
T-Square (or ruler of choice), X-Cato blade, and glue. Not to forget the cutting mat.
 

I decided to base the top level of the Roll Arena on Black Foamboard
(this will keep the arena sturdier, but prove a mistake in the end)
 

Top level all assembled. All of that is made with paper!
the holes in the corners are for later.
 

Top of Arena from a side view for height purposes.

 This is the card drawer. All still paper. I noticed when sliding this
in and out, it needed under reinforcement so I glued a wide strip underneath.

A drawer is about to be assembled.

Drawer with the faceplate and handle.

Drawer completed! just paper and glue.

The bottom layer of the Roll Arena. The white areas will glue to the
underneath of the top section.
 

Roll Arena assembled! Not quite, something is missing.
 

 now Roll Arena assembled!! So beautiful.

Look at those drawers! sliding in and out.

 The Roll Arena also comes with 5 alternate wheels you can place inside, over the base floor. Each of them are another amazing piece of work and have additional uses for in your games. I actually didn't print any out, but if I did I would use sticker paper to print on and attach it to a piece of  foamboard.

There you have it! It is beautiful. Very few complaints I have about this one, more like suggestions for my next one (or if you get to build one).
1. Edge the edges. This means take a black sharpie and go over the white edges of paper to create depth and take the white out of the picture.
2. While the foamboard provides sturdiness for the top level, it partially takes away for the art of the Roll Arena. Use foamboard for under the alternate wheels instead to place inside.
3. The card drawer (the long one) is partially flimsy. To remedy glue a wide and long strip underneath connecting all the card slots together.
4. The card drawer is tricky to pull out and push in. The edges of each slot catch sometimes on the corner pieces. Possible remedy to glue a "guide track" inside for smoother pull/push.

I can wait to use this as practical as it is, and very affordable. Thank you to the crew at WorldWorks Games for making another incredible piece of work!

Sunday, September 18, 2011

Terraclips Build Two

Hi there, welcome back (or first time welcome). The past two weeks have been crazy enough that just now I have been able to upload some pics of a variety of projects I was working on. Right now I am able to present to you my Complete Build Two using the all 3 of the Terraclips sets again.

Again with my limited space option the whole piece is in sections for ease of storage and ease of accessing different areas. The complete build is a total of 1 3/4'x1 1/2', but it is also 4 layers, 6 for the tallest house. This build I have dubbed "The Manor", and as you will see is pretty cool (at least I thought so). So without wait, enjoy the pics!

First off we have a few overviews with different angles:
Front Overview. Here you can see an entrance into
the guest house and the fountain in the front.

Right side overview. Ignore the open walls (again I was short walls for the build).
But look at the balcony connecting the 2 buildings together. And that roof...
Back overview. Here you can see the balcony better.

 Left side Overview. From this angle you can see the main house entrance
and the balcony connecting to the second floor.

Lets tear the buildings down bit by bit, with a play by play.:

 Top roof of main building removed.
You can see 3 rooms on the top floor.
 Second layer removed. This includes the main roof of the
second building and the complete roof of the first.
 Third layer removed. Here you can see multiple rooms in each
building and the balcony that connects the two buildings.
 Fourth layer removed from the main house, 
just to show the balcony sitting freely and how it connects.
Fourth layer completely removed, including the balcony. The archways in the back
are not connected in any fashion and that area is open outdoors type.

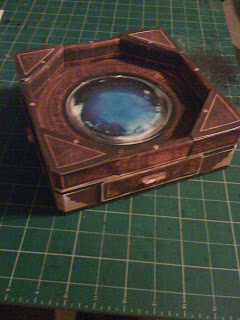
Next we will take a closer look at how I did that fountain sitting in the front.

 Close view of the fountain. For this piece was rather simple.
We took the fountain floor tile and placed arches joined
together on top, not attached to the tile.
 Here you can see the arches simply removed.
 

This was a little smart on my part (i think). I took a Sewer floor tile
and connected it to other floor tiles with the T-Clip. Then to build
up the fountain, I simply used the balcony sides as the "walls".

Quite easy and gives some height to the fountain without it being too tall. Also gives nice structure to the piece without hindering for movement.

Next we will tear down the rest of the build for your excitement!

 As you can guess, the Sewers are underneath the build. 2 layers of sewer crawl, smell that?

 First half of the streets gone for show of sturdiness.
 Street level all gone. Here are the sewers top floor.
Notice the gap in flooring middle right side?
 close up of gap in floor. This was to lead a way between the two sewer levels.
 Bottom right corner. This is directly below the main house.
 Bottom left corner, directly below the fountain area.
Backside area.
 Half of first floor removed. The gap in first floor falls right
into the three-way tile.
 Complete bottom level of sewers (and the build). Again walls are missing, but doesnt prevent the sturdiness of the build once tiles are joined together.
Sewers lower level, broken apart to show how they separate.

And there you have it! Out of all the clips I purchased, I still had no L-Clips left over. The walls again were scarce, and if you look close enough, the buildings had a mix of street and building walls. Again this was using only 1 box of each of the Terraclips and 4 boxes of connectors. It was, and still is, fun to make these builds and I hope you enjoyed this one!