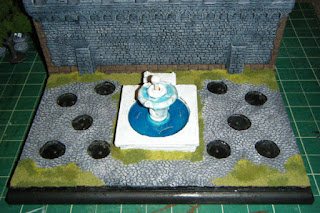
Here we GO! The last post of the tutorial of the Keep Diorama. In this post we take all previous Keep Diorama posts and and them together for a final, wonderful, piece (at least we hope so).
STEP 1: Gather EVERYTHING!
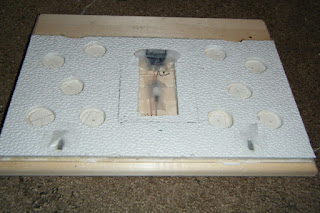
Ok, everything that was previously worked on. We have our base, our fountain, and our trusted low temp hot glue gun. Here you can also see the peg for the fountain stem is removed. Also a battery cover that I didnt really go into. The battery cover is made from a small block of pink insulation foam and painted up in the same fashion as the fountain.
The Battery cover was glued into place, with the hot glue. The top of the battery cover is removable, held in place with 2 toothpicks so the top can be removed to replace the battery (if ever needed).
STEP 2: Glue
Here you can see we (I, dont know why Im talking in third person) Take hot glue around the area where the fountain will go. I wanted to make sure the switch lines up with the hole in the bottom of the fountain so the peg can reach it.
Place the fountain firmly into the hot glue to seal it in place. Hold it in place to secure it. IF it doesnt hold properly, you can lay down another thin layer of hot glue around the edge to hold it down. Dont worry, it will be covered with the grass later on.
WATER BREAK! As I said in the "Making the fountain adding water" post, wax paper shrinks. Here you can see it broke in half.
So I cut off the excess that didnt look right. Trimmed the bottoms that did connect to the water (you can se it below). And carefully (if you still have room) add more water using the Easy Cast in the same fashion as before. If you do this then you MUST wait for the water to dry before the next step - because grass in your water is yucky!
STEP 3: Adding the wall
As stated before, make sure your water is COMPLETELY dry before continuing on.
The wall is the back of the display piece. This wall is from Games Workshop. It is the Fortress wall and comes in two pieces (front and back). It is unpainted...no real pictures for that as this one was given already painted to me. This was glued into place using the Hot Glue gun. It doesnt line up flat with the back of the base (random stone board), but that is ok as we will fill the gap with grass.
STEP 4: Adding Foliage
We are going to add 3 different types of grass blends here to the base. You could use two and be ok, I am crazy and so I am using 4 types of grass foliages. Using the picture above, add your white glue to the areas where the first layer of grass will be. This is the largest section of grass so use what you want.
(NOTE: leave the lights exposed this whole process)
First layer of grass type here is Green Flock by Woodland Scenics.
After pressing grass in place letting it dry, turn the project upside down and shake off the excess.
Second layer of type 2 grass. Place your glue where you want that to go. Remember overlapping the grass types is good, nature is random.
Second type of grass in place is Static Grass: Green by Gale Force 9.
Shake off the excess after covering the glue areas. You can still see some light of the glue underneath the static grass. You can let it dry clear, or you can add a third layer of grass. Before the glue dries, I added Blended Turf: Green Blend by Woodland Scenics to the static grass areas. I pressed the Blended Turf into the glue areas, then shook off the excess.
Complete!
The multi layers of grass look nice right? To cover up the lights I used a new product - Jungle Tuft (6mm) by Army Painter, part of their Battlefields series. It comes in nice random sections of grass tufts that are sticked to a paper. It holds great to the grass already, or you could add a drop of super glue (Zap-A-Gap) to hold it in place.
You want to make sure you dont cover the light itself, but the area it comes thru. For good measure, take a few more of the random tufts and place in random areas.
Lights off
Lights on!
And there we have it! all that hard work paid off!! One more post to go, and that would be the various pictures of the completed piece: the Keep Diorama!
Oh crap! I forgot to talk about the peg insertion...Well the peg in the center of the fountain stem slides right thru the fountain stem, thru the fountain itself and onto the top of the switch! The peg acts as the base for the on/off switch! But it didnt work completely, it needed something. It acts as a click pen, so I added a spring onto the bottom. I took an old click pen and tore it apart. Took the spring out and cut it in half. Drilled a small hole in the bottom of the peg and glued the spring in place.
With the spring dried in the bottom of the peg it fits perfectly thru the fountain and rests perfectly in the position I wanted. Lights on, lights off!
I need to get better at following myself with pictures as I do these projects, sometimes its hard to remember taking pictures where your deep into a project. Next up: Completed Keep Diorama!


