Saturday, December 31, 2011

Keep Diorama

And here we are last post of 2011. Last project of 2011. The Keep Diorama.
This was a fun project and took a bit of time. Things went wrong in the beginning (not getting the wall order that I wanted, battery holder snapping from wires, wax water snapping. But in the end everything came together great (at least I think so). Here are some pictures:

 One of the wax water left on as a little overflow frozen in time.

 Lights ON! I get a kick out of that.

 Lights ON, different angle. 

 One of the spots is covered with a custom base made earlier.
See how it blends in?


And now for placement of all things: The display, the miniatures, the extra base, and the tree.

With everything on the base, and all the bases the same size, you can interchange the placement of all objects. Moving the tree and heroes wherever you wanted them to be. I wanted to add a nameplate up front, but there wasnt enough time - that and I couldnt name a piece for someone else.

Overall I was happy with it, and so was the client - which is the important part.

Thanks for reading along everyone that has. Have a safe and happy New Years celebration, I will be back next year (tomorrow really, but hey)!

Keep Diorama: Bring it together

Here we GO! The last post of the tutorial of the Keep Diorama. In this post we take all previous Keep Diorama posts and and them together for a final, wonderful, piece (at least we hope so).

STEP 1: Gather EVERYTHING!

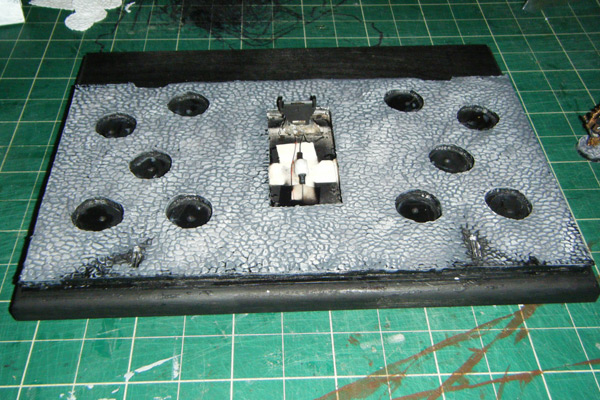
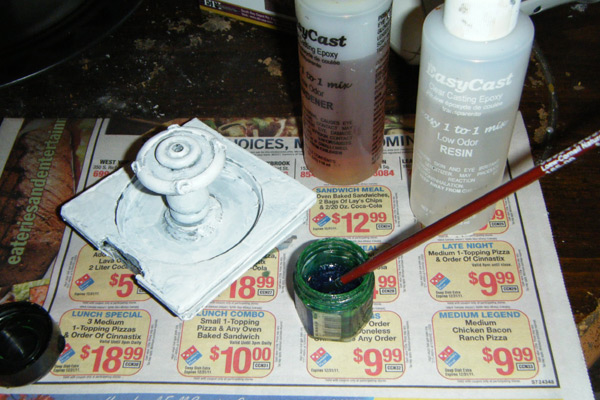
Ok, everything that was previously worked on. We have our base, our fountain, and our trusted low temp hot glue gun. Here you can also see the peg for the fountain stem is removed. Also a battery cover that I didnt really go into. The battery cover is made from a small block of pink insulation foam and painted up in the same fashion as the fountain.

The Battery cover was glued into place, with the hot glue. The top of the battery cover is removable, held in place with 2 toothpicks so the top can be removed to replace the battery (if ever needed).

STEP 2: Glue
Here you can see we (I, dont know why Im talking in third person) Take hot glue around the area where the fountain will go. I wanted to make sure the switch lines up with the hole in the bottom of the fountain so the peg can reach it.

Place the fountain firmly into the hot glue to seal it in place. Hold it in place to secure it. IF it doesnt hold properly, you can lay down another thin layer of hot glue around the edge to hold it down. Dont worry, it will be covered with the grass later on.

WATER BREAK! As I said in the "Making the fountain adding water" post, wax paper shrinks. Here you can see it broke in half.

 So I cut off the excess that didnt look right. Trimmed the bottoms that did connect to the water (you can se it below). And carefully (if you still have room) add more water using the Easy Cast in the same fashion as before. If you do this then you MUST wait for the water to dry before the next step - because grass in your water is yucky!


STEP 3: Adding the wall
As stated before, make sure your water is COMPLETELY dry before continuing on.
The wall is the back of the display piece. This wall is from Games Workshop. It is the Fortress wall and comes in two pieces (front and back). It is unpainted...no real pictures for that as this one was given already painted to me. This was glued into place using the Hot Glue gun. It doesnt line up flat with the back of the base (random stone board), but that is ok as we will fill the gap with grass.

STEP 4: Adding Foliage
We are going to add 3 different types of grass blends here to the base. You could use two and be ok, I am crazy and so I am using 4 types of grass foliages. Using the picture above, add your white glue to the areas where the first layer of grass will be. This is the largest section of grass so use what you want.
 (NOTE: leave the lights exposed this whole process)
 First layer of grass type here is Green Flock by Woodland Scenics.

After pressing grass in place letting it dry, turn the project upside down and shake off the excess.
   Second layer of type 2 grass. Place your glue where you want that to go. Remember overlapping the grass types is good, nature is random.

 Second type of grass in place is Static Grass: Green by Gale Force 9.
Shake off the excess after covering the glue areas. You can still see some light of the glue underneath the static grass. You can let it dry clear, or you can add a third layer of grass. Before the glue dries, I added Blended Turf: Green Blend by Woodland Scenics to the static grass areas. I pressed the Blended Turf into the glue areas, then shook off the excess.  
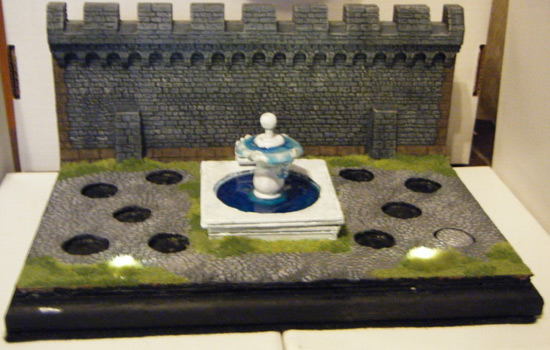
Complete!
The multi layers of grass look nice right? To cover up the lights I used a new product - Jungle Tuft (6mm) by Army Painter, part of their Battlefields series. It comes in nice random sections of grass tufts that are sticked to a paper. It holds great to the grass already, or you could add a drop of super glue (Zap-A-Gap) to hold it in place.
     You want to make sure you dont cover the light itself, but the area it comes thru. For good measure, take a few more of the random tufts and place in random areas.
 Lights off
Lights on!

And there we have it! all that hard work paid off!! One more post to go, and that would be the various pictures of the completed piece: the Keep Diorama!

Oh crap! I forgot to talk about the peg insertion...Well the peg in the center of the fountain stem slides right thru the fountain stem, thru the fountain itself and onto the top of the switch! The peg acts as the base for the on/off switch! But it didnt work completely, it needed something. It acts as a click pen, so I added a spring onto the bottom. I took an old click pen and tore it apart. Took the spring out and cut it in half. Drilled a small hole in the bottom of the peg and glued the spring in place.
     With the spring dried in the bottom of the peg it fits perfectly thru the fountain and rests perfectly in the position I wanted. Lights on, lights off!

I need to get better at following myself with pictures as I do these projects, sometimes its hard to remember taking pictures where your deep into a project. Next up: Completed Keep Diorama!

Friday, December 30, 2011

Keep Diorama: the Base

Continuing the series for the week on my last commission project of the year, we will now take a look at the creation of the base display. Now as it may seem each of these parts was worked on one at a time, in actuality they were all worked on at the same time.

There should also be a note here that explains that I have become obsessed with adding lighting to big projects. Well only on that Cryx Command HQ Trench I did, but I became hooked after that! So I wanted to add lighting to this display as well.

STEP 1: gathering your materials

So not all in 1 picture but here is what we have.
1 sheet of the Plastic Veneer - cobbled/random stone. This is the same sheet we used to make our custom bases. 1 piece of foamboard. This board was already marked and cut out for everything to fit in it. The foamboard measured 8"x11" and actually matched the size for the Veneer sheet, luck or coincidence?
We also use a wooden plaque picked up from a local arts store (this one measures 9"x12", but the top is perfect size for our 8"x11"). And last but not least is a lighting kit (more on that later)

If you get your sheet, just set your base onto the sheet, trace around the edge with a pencil where you want to place bases (a good layout goes along way), and then cut out the shape using a sharp knife. Save these circles tho, we will use them later.

STEP 2: Setting the Lights
Here is our lighting kit already in place on the wooden plaque. This kit is awesome as it comes with the battery holder, the button switch and 2 lights. First I sized up where I want it to be, the taped into place. Solder the red and black wires (red with red, black with black). The battery pack was hot glued into place so it stays where I want it. You may notice the picture above have holes already cut where everything is going.

 On. Off. On. Off. It WORKS!!

 STEP 3: Placing
So now that the lights are in place (and they work) we begin laying the flooring.  First we use the Hot Glue gun and glue together the Plastic Veneer sheet to the foamboard. Next we get a bit tricky. Using a sharp knife cut the holes out of the Plastic Veneer using the holes in the foamboard as a guide.
Finally we Hot glue again the foamborard to the Wooden Plaque.
     Remember those circles we cut out of the foamboard? Take those and cut in half so you have 2 circles half as thick. Hot glue those to the wooden plaque where there are openings.

STEP 4: Painting
BEFORE you being to spray prime the base you want to do a few steps.
FIRST, tape off the lights, switch, and battery area with basic tape. SECOND, seal off the edges of the display base with regular white glue. This also includes the insides of the circles for the bases. After you got those covered (and the glue dries) then you are free to prime the base  (I used black).
 All primed and ready to go.

Using the BASIC brand of paints that I used in the fountain tutorial, I start with a layer of black/grey (50/50). The lights are still covered with tape, we dont want them covered up just yet.
 The whole of stone is covered in the black/grey blend.
 Add more grey to random areas using a drybrush effect.
 Adding more grey with drybrush. Then add white to random areas.
Now we take a brown color and edge where we are going to place foliage like grass.

And there you have the basic display base mounted on its frame, a wooden plaque. Its all starting to come together, but we will have to wait until tomorrow to see that.

Thursday, December 29, 2011

Keep Diorama: the Fountain part 2: Painting and water

Now we have our fountain assembled and ready for painting. First we should make sure that any part of foam (board or core) is covered with basic white glue, sometimes foam will melt in contact with spray primer, and that would ruin our shape. Second we want to remove the peg from the stem, remember we dont want that peg to stay in one place.

STEP1: Spary
Using your Spray primer (only time I use mine is for terrain) spray coat the whole fountian. Remember to remove the peg. Also use a nice open area. I went outside, this pic is after it dried (Im not that good)

STEP 2: Paint!
So you can see here the paints I used. This brand was picked up at local arts store, cost around $5 each. A wide paintbrush. Mix colors how you see fit. I went for a semi marble appearance.

 basic layer, all grey.
 added a drop of Blue ink for a bit of color
 add some white
 add some more white, then pure white to highlight areas.
Make sure to have all the colors you want in. After this there is adding water, so we want the paint to dry completely, best overnight to make sure.

STEP 3: WATER!
Perhaps the trickiest part. If not applied correctly it could mess everything up. First a note: I had to cut out the back end of the fountain for the battery fit (but I will get into that tomorrow).
WATER! You can see here I am using EasyCast 2 part epoxy. This is the one I use, there are others out there, but I got this on sale and it always comes thru for me. 
You want something to stir the mix with (an old brush in this case), and something to mix in (an old GW paint pot). Also something to measure, I use an old teaspoon. Be VARY CAREFUL while mixing this stuff. You want even parts, and lay down a newspaper whilst working, just in case.
Everything should be sealed in tight before you lay down the water, if not it could leak and cause a big mess. I add a drop of blue ink into the mix to add color. You want to lay down 1 layer of basic water, enough to fill the bottom of fountain half way.

STEP 4: Waterfall
Now for an extra step adding detail.
(NOTE: Wax paper with epoxy will shrink, I just learned this while working on project)
WE will use Wax paper, its clear and will absorb some of the epoxy for a nice effect. Zap-A-Gap is also clear and will hold the wax paper down.

Take some wax paper and cut strips that will fit from the upper lip of the stem into the water below.

Super glue the top of wax paper to the upper lip. Bend some of the wax paper so it will touch the dried water below.

OK , lets try that again. Here is the water on the upper lip. We add new strips of wax paper, smaller ones this time.
Carefully pour a new mix of epoxy onto the top of the stem (over the lip) and onto the wax paper, allowing it to drip into the water below.
 
 And there we have our water! looks nice right? Now we allow to dry overnight and hope for the best.
At this time you also want to make sure the peg is still fully removable, or you may have problems later.

Tomorrow we will look at the base display creation, until then I am going to try to read...new projects begin in the new year!

Keep Diorama: The Fountain part 1: Creation

Today we will dive into the creation of the fountain for my commission diorama display piece, my last project of 2011, the Keep Diorama. This was a big project and took a bit of time (over 1 month) with my full time job and the holidays and a bunch of other things I had to juggle inbetween. But enough of that, i loved working on it so here we go with some tutorial!

The fountain set will be broken into 2 parts. Part 1: Creation, Part 2: Painting and adding water!

Making the Fountain. Part 1: Creation
STEP 1: Gather your materials

Basic materials used for creation of the fountain base. Here we have some pink insulation foamboard, picked up from your local hardware store this is 1" thick. The white sheet is your average white foamboard (1/4" thick), picked up from loacal arts & crafts store (or Walmart if you can). A sharp, sharp knife. And last we have our base, a lid from a Gale Force 9 terrain effects container. Dont forget our trusty cutting mat.

STEP 2: Size up the container
We cut the pink foam down to size, the fountain is a 3"x3" area base, leaving a 1/4" around the sides to hold the container lid.

Next we press the lid down into the pink foam to get the rough size that the lid will fit into.

Cut away the middle, its ok to cut into the foam like I did here.

Now we get to dry fit the container lid into the pink foam. See almost a perfect fit.

You may notice I used black foamboard here. There is no difference to use black or white, just what you have available and the right size.
STEP 3: Tippity top
Now we take some of our foamboard (black or white 1/4" thick), and cut a square of 3 1/4"x3 1/4".
 Next we again line up the container lid. trace an outline, then cut away the middle. This will serve as the top area of the fountain, hence the overlap of size.

STEP 4: Bottom of the heap.
Now take more foamboard, white in this case, and cut out 2 3"x3" squares. This will serve as the bottom of the fountain.

a dry fit of all our pieces is shown here.

STEP 5: Adding details
You can see here in this step (sorry no how to pics), I added some detail to the edges of the fountain. What I did here is simply explained:
FIRST we glued (using our white glue, PVA, or other basic glue) the pink foam to the 2 white foamboard layers, sizing them up straight with each other. Any excess was trimmed off, remember we want a 3"x3" area.
NEXT we took some hobby styrene - these happen to be from Plastruct (you can get some on their website or most train hobby stores). On the bottom we have an I-beam (#90536), and on the top area is a half circle (or half round-#90886). Size them up and cut to shape.
LAST. Using a low temp Hot Glue gun, spread glue evenly (working one side at a time) and place the strips onto the fountain base. This executes 2 things at once. First, it makes the fountain look better than plain sides. Second, it protects the foam from any paint that may damage it.


STEP 6: Putting it all together
Now we assemble. Again dry fit first to make sure all parts line up and to make one last adjustment. The stem peg (from yesterday) is still removable. You want the base of the fountain, then the container lid. Fit the top of the fountain (the black foamboard) ontop. Center the stem in the middle of the fountain, and put a drop of paint onto the bottom of the peg. As you drive the peg thru the stem it should makr where it will come out onto the container lid. This is where we will want to drill a hole thru. This will allow the peg to pass thru the complete fountain.

Here we see the dry fit, the stem in the center and the peg marking where I need to drill the hole.

 STEP 7: Assemble!
Container lid is slotted into the bottom of the fountain. Hot glue is used to join the two. Add the top of the fountain (again using hot glue).  The Fountain stem is joined to the inverted lid with...hot glue. The peg is still removable.

And there you have the fountain assembled. Next we go into the painting and adding water!