So here we go, walls and their assembly::
First up is the 4" wall. Here you can see the printout copy.
I was able to fit 2 of the 4" walls on 1 8 1/2x11 paper.

One 4" wall cut out and ready for assembly.
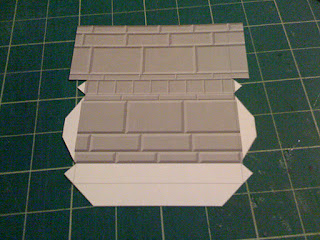
One completed 4" wall.

Next up is the 2" wall. Here you can see there are 3 of the 2" walls per page.

2" wall cut out and ready for assembly.

2" wall finished.

Now for 1" walls. Here we can see there are 5 of the 1" walls on one page. This is the actual prototype page, I ended up shorting the top fold, but after some work made it longer, It wasnt fitting right.

Here is a 1" wall all cut out and ready for assembly.

One complete 1" wall

And those are the walls. The biggest trick is making sure those walls all line up with the same design.
Right now I will show you a sneak peak ;)

Blurry pic, but they all match up. And this is all coming together. I just need some doors now, and that is for another post. Next time on WIP 8bit dungeon I will show the look into the doors for this dungeon. Until then
No comments:
Post a Comment