As before this could be used as a semi tutorial for the Fat Dragon Games EZ Dungeon. Although this is still the prototype of my own modification the "8-bit Dungeon". Ready? Here we go::
Pillars and floor covers::
So here we have the printed page of the pillar and floor covers. Retro right? I hope so, thats what I am going for. Anyhow you can see the floor covers look just like the floor tiles, lets hope they match up.
We cut one of the pillars away from the rest of the page, being careful not to cut away the white blank areas, those are how we glue this thing together.
Cut free, glued, and assembled. Here we have 1 - 1" square pillar. Notice the white strip at the bottom? that is there on purpose, you will see later.

One page completely cut out and assembled. Here we have 2 of the 1" square pillars and 5 of the floor covers. Now we will see how everything matches up.
Assembly of the floors::
We take our floor tile, the one completed from the other post. 8"x8".
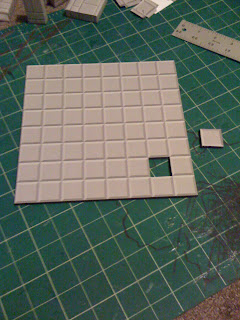
Measure in 1" and up 1". Easy for me since the squares are exactly 1"x1", the typical size block for movement. We use a SHARP balde to make the cutting easy. A dull blade may tear the foam below and botch up the design (both the art and the placements). Now cut out that square.
Follow suit with cutting the next block out. And the next and so on.
Here you see all 4 blocks are cut out. You can even see the squares that were removed.
Here is the complete complete 8"x8" floor tile. On the side are the tile covers and we will see if they match up.
You be the judge here. 2 of the empty spots are covered with the floor covers. At first glance you can barley tell they are there. Overall I think they work perfect.
From another angle. I dont even notice where the other one is at first. This is a happy moment.
Now for the pillar test. This is the pillar from earlier, lets see (and show) how it fits.
Pillar inserted into the hole. The white ring left at the bottom is hidden and the pillar fits snug. This shot is to show a pillar, 2 floor covers, and one square left open.
All in all, I think I am off to a good start. Next we (I, I mean I) will show you some walls that were done up. Remember to use a fresh clean sharp blade when cutting foam. Also remember to keep fingers clear from the blade :)


No comments:
Post a Comment